[SAP ABAP] Building User Interfaces
In Systems, Applications, Products (SAP), we have various technologies for presenting user interfaces. We can use classic DynPro, which we will focus on in this chapter. This is based on the SAP GUI and is almost completely integrated with ABAP and web-based technologies such as SAPUI5.
Classic DynPro is divided into two categories:
- Classic DynPro
- Selection screens
Despite the fact that these two categories use the same technology, the methods for programming them are different.
Classic DynPro (named screen) needs to be created in Screen Painter in the ABAP Workbench, as well as being called in
CALL SCREEN statement. The selection screen can be defined purely in ABAP and it is a specific classic DynPro.Classic DynPro
As some may not know the basics of classics DynPro, I will start with a short introduction explaining how we can call screens or types of screens. If you have some knowledge of screens, you can skip this part.
Firstly, we need to know what types of screens exist. The classic DynPro screen is divided into four different types, as follows:
- Normal
- Subscreen
- Modal dialog box
- Selection DynPro (also known as the selection screen)
Normal is a regular screen, which is mostly used to create a screen. Subscreen is used when we want to embed another one. The modal dialog box is a screen that does not take up the whole screen, like a popup.
As previously stated, classic DynPro is called using the
CALL SCREEN. All screens are numbered with up to four digits. We can use a number from 1 to 9999. The number 0 is not allowed.
When we click on
CALL SCREEN, we can create a screen using a number of our choice.
For example, when we use
CALL SCREEN 100, we are asked whether we want to create a screen; if we click YES, we will see the following window: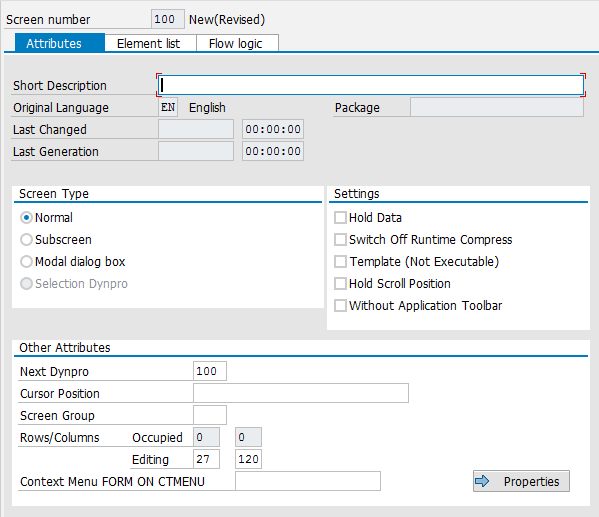
Screen options
In this window, we can define values such as a short description (mandatory field) or how many rows and columns will be used.
In the next tab, we can see all elements in a given screen, such as custom containers and text.
The third tab is crucial for the whole process of screen creation. In the
Flow logic tab, we can define Process Before Output (PBO), Process After Input (PAI), chains and field behavior. Field behavior serves to, for example, check the value of a single field, while chain checks look at the values of multiple fields. Chains are used to set the order when checking fields and modules.
PBO is a process that happens before output in which we can have all actions defined between the call screen and output screen. For example, here we can use the
SELECT statement to get data before the screens are shown.
PAI is a process that occurs after input. In PAI, we can define what happens when we take actions on the screen, such as clicking a button.
To open a screen painter, you need to click on the
Layout button in the main screen window. After clicking, a window appears: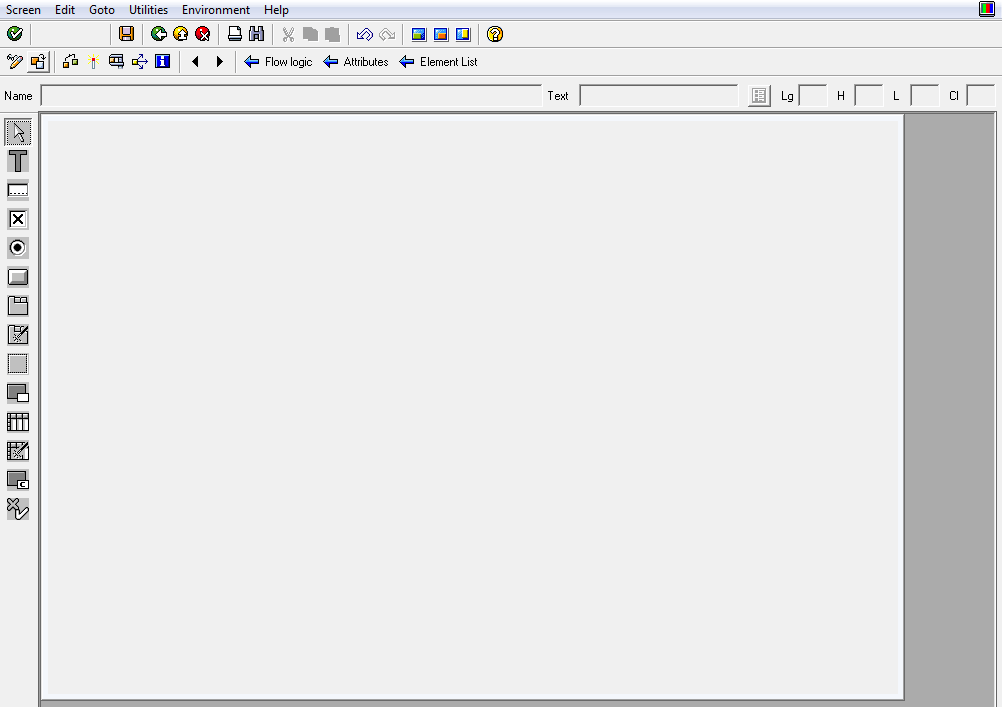
Screen painter
At the top of the window, there are several icons. Some of these are standard icons such as activate or test. Here, we also have three buttons specific to DynPro:
Flow logic, Attributes, and Element List. These buttons are used to move us to corresponding functionalities. For example, when we click Element List, we get a list of all elements on the screen. At the top, we also have the Name and Text input fields. All of the UI components need to have a unique name and, for some components, we also need to put some text on them.
On the left side of the window, we can see all of the UI components of which our DynPro can be composed.
- Text field: This is a non-dynamic text field where we can put some text.
- Output/Input field: This is a dynamic text field where we can input some text. We can also get this field as an output field.
- Checkbox
- Radiobutton
- Pushbutton
- Tabstrip
- Tabstrip (with the wizard).
- Box.
- Subscreen arena: This is an arena where we can embed a subscreen.
- Table control.
- Table control (with the wizard).
- Custom control: We can embed custom containers, which are used to embed ALVs, for example (more information on that later in the chapter).
- Status icon: This describes a specific output/input field with icons.
A selection screen is a specific type of screen used to create selections, such as parameters, and to select queries or ranges. To create a selection screen, we can use the parameters or the selection option.
If we use
PARAMETERS, we can create a single input field to put values in, in contrast to the select-option, where we get two input fields; the first is a lower value and the second is a high value of a range. Parameters and the select-option inherit values from search-help if it was created for using data elements.
To create parameters, we can use the following statement:
PARAMETERS: p_car TYPE s_carr_id.
To create select-option, we can use the following statement:
SELECT-OPTIONS s_con FOR lv_connid.Lv_connidin the preceding example needs to be declared before select-option is called.
The following example shows shortcode in which we can see how to use parameters and the select-option in the
SELECT statement. In this example, we use a parameter to select the values of carrid and select-options to select connid:DATA: lv_connid TYPE s_conn_id.
PARAMETERS: p_car TYPE s_carr_id.
SELECT-OPTIONS: s_con FOR lv_connid.
SELECT *
FROM spfli
INTO TABLE @DATA(lt_spfli)
WHERE carrid = @p_car
AND connid IN @s_con.
In the selection screen, we also have some more advanced options. For example, we can group elements of a screen or add elements such as a checkbox or radio button.
To create a checkbox in the selection screen, we can use the
AS CHECKBOX statement. The field with AS CHECKBOX needs to have a maximum length of 1:PARAMETERS: p_car TYPE c AS CHECKBOX.
When a checkbox is selected, the value of the
p_car field is X, otherwise, values of the field are required.PARAMETERS: p_car TYPE c RADIOBUTTON GROUP rb1,
p_con TYPE c RADIOBUTTON GROUP rb1.
The name of the radiobutton group is very important as this needs to be the same in one group, otherwise, these parameters will be presented like radiobuttons, but without the main radiobuttons specifics, which makes it possible to select only one at a time.
- Obligatory: After this addition, parameters will be obligatory to fill.
- No-display: This means that the parameter is not displayed on the selection screen. We can use this if we need to have this parameter in the interface, but this will only be used when we
SUBMITa program. - Visible length: This describes a parameter where we can define the length of the input field.
As well as the preceding capabilities, in select-option, we also have a few more:
- No-intervals: When we use this addition, the select-option will be created without a second input field. Intervals can still be selected in the dialog box for multiple selections.
- No-extension: When this addition is used, a pushbutton will not be created for multiple selections.
- Default: The selected option will be started with some initial values.
- Lower case: This addition prevents the content of character-like fields from being converted into uppercase if data is moved from Selection Screen (SS) to screen and vice versa.
- Matchcode objects: This creates the association with search-help defined in the ABAP dictionary.
- Memory ID: After inputting any value to the field with this addition, values from the field will be moved to user memory.
We can also create a block in selection screens, for example, if we want to create the screen presented here:

Selection screen
We can use the following code to display the screen:
DATA: lv_connid TYPE s_conn_id.

 SELECTION-SCREEN BEGIN OF BLOCK b1 WITH FRAME TITLE text-000.
 PARAMETERS: p_car TYPE s_carr_id.
 SELECT-OPTIONS: s_con FOR lv_connid.
 SELECTION-SCREEN END OF BLOCK b1.

 SELECTION-SCREEN BEGIN OF BLOCK b2 WITH FRAME TITLE text-001.

 PARAMETERS: p_dom TYPE c RADIOBUTTON GROUP rb1,
             p_int TYPE c RADIOBUTTON GROUP rb1.

 SELECTION-SCREEN END OF BLOCK b2.
When we need to create text for a field, we can define it in
GOTO|TEXT ELEMENTS. After clicking on this, we get the following screen: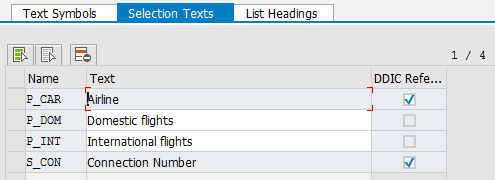
Selection text
If we want to create text, we can put our text in the input field or we can use the reference from the Data Dictionary (DDIC).
On the selection screen, we can define several events. These events are processed during the processing of the selection screen.
A list of selection screen events is provided as follows:
OUTPUT: This is an event raised during the PBO of the selection screen. This is used to prepare data in the selection screen or dynamic modifications of a screen.ON: This is an event raised during the PAI of the selection screen.ON END OF: This is an event raised after the selection table is passed to the program and after user action in the dialog box for multiple selections has taken place. In this event, entire selections can be checked.ON BLOCK: This is an event raised when all fields in a block are filled and passed to the ABAP program.ON RADIOBUTTON GROUP: This is an event raised when data from radio buttons are passed to an ABAP program.ON (HELP REQUEST | VALUE REQUEST) FOR: This event is raised in a Process On Help Request (POH) and Process of Values Request (POV), when F1 (help) or F4 (values) is called. It can be used to create custom help and overrides the help from the ABAP dictionary.ON EXIT COMMAND: This event is raised when a user has called one of theBack,Exit, orCancelfunctions. Any cleanup actions can be executed in this event block.
One of the most common uses of events in the selection screen is using the dynamic modification of the selection screen.
First of all, we need to add
USER_COMMAND and MODIF ID to the corresponding fields:DATA: lv_connid TYPE s_conn_id.
SELECTION-SCREEN BEGIN OF BLOCK b1 WITH FRAME TITLE text-000.
PARAMETERS: p_car TYPE s_carr_id.
SELECT-OPTIONS: s_con FOR lv_connid.
PARAMETERS: p_type TYPE c AS CHECKBOX USER-COMMAND uc1.
SELECTION-SCREEN END OF BLOCK b1.
SELECTION-SCREEN BEGIN OF BLOCK b2 WITH FRAME TITLE text-001.
PARAMETERS: p_dom TYPE c RADIOBUTTON GROUP rb1 MODIF ID b2,
p_int TYPE c RADIOBUTTON GROUP rb1 MODIF ID b2.
SELECTION-SCREEN END OF BLOCK b2.
We can mark the
p_typeparameter here, and the second block will be shown.
In order to create this action, we need to assign a user command to the checkbox and create a corresponding PAI action. Pressing the button will call the PAI action with the user command UC1 ( this action will do nothing, as it was not created) and then the PBO will be launched. In the PBO, the code under
AT SELECTION-SCREEN OUTPUT will be executed. We need to make it this way because we want to initially get the screen without this component and turn it on only when the special condition is fulfilled.
For changing the selection screen, we also need to assign the
p_dom and p_int parameters to a modification group named in the b2 example. We need to create this addition to indicate which field should be changed:AT SELECTION-SCREEN OUTPUT.
LOOP AT SCREEN.
IF p_type = abap_true AND screen-group1 = 'B2'.
screen-active = 1.
ELSEIF p_type = abap_false AND screen-group1 = 'B2'.
screen-active = 0.
ENDIF.
MODIFY SCREEN.
ENDLOOP.
Right after defining a selection screen, we can add the preceding piece of code. In this code, we can see the event definition (in our example, this is the output). We make a loop at the screen to check every field and check whether or not our condition was fulfilled.
We also need to remember to add the
MODIFY SCREEN statement. Without this, any change to the screen will not be visible.
Comments
Post a Comment